
Since 1996
519-440-3463
Want More Energy? Eat this Raw Superfood Breakfast!
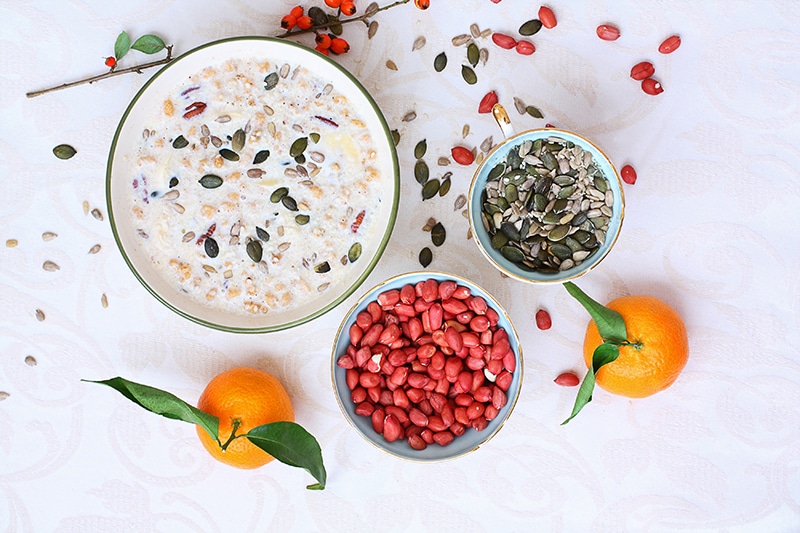
Buckwheat has a rich supply of flavonoids, like rutin. Flavonoids are phytonutrients that protect against disease by extending the action of vitamin C and acting as antioxidants. Buckwheat is also high in protein, fibre, gluten-free, alkalizing for the body, and high in calcium.
I’ve been making this recipe for 6 years and it is still one of my favourites because it is so versatile. If you have a dehydrator you can also dehydrate this granola for a crunchy version!
Energize with this Raw Superfood Breakfast Recipe!
Ingredients:
- 1 cup Raw Hulled Buckwheat (soaked overnight, strained and rinsed in the morning)
- 1 cup Dried Coconut Flakes (unsweetened)
- 1 cup Seeds/Chopped Nuts: mix any Hemp, Sunflower, Pumpkin, Jungle Peanuts, Pecans, Walnuts, Almonds, Brazil Nuts
- 1/2 cup Dried Fruit (Goji Berries, Currants, Raisins – all unsulphured and without hydrogenated oils)
- 1–2 tbsp Raw Honey or Maple Syrup
Optional:
- 2 tbsp. Coconut Oil (to lower glycemic index and stabilize blood sugars)
- 1 tsp. Spirulina
- 1–2 tbsp. Raw Cacao Powder
- 1–2 scoops Protein Powder
- 1–2 tbsp. Maca Powder
- Orange or Lemon zest
Directions:
1. Take 1 cup raw buckwheat (also called groats) and rinse under cold water. Place in large glass bowl and cover with 6 cups of water. Leave on counter overnight or for at least 6 hours, to begin the germination process.
2. In the morning, or 6 hours later, strain buckwheat with fine strainer and rinse well.
Note: Buckwheat will appear slightly slimy.
3. Ensure buckwheat is well rinsed and patted dry with paper bowl. Leave in fine strainer or sprouting tray (can be purchased online or in health food stores) with a bowl underneath for 24 hours to sprout or proceed to step 4 immediately.
4. In a large bowl, mix soaked/sprouted buckwheat with 1 cup of coconut flakes, 1 cup of nuts or seeds, 1/2 cup dried fruit, and 1-2 tablespoons sweetener plus any other additional toppings.
5. Enjoy with your favourite homemade dairy-free milks, yogurts or creams and fresh fruit! Store covered in the fridge for up to 3 days.
Homemade Dark Chocolate
Very fast, very flexible, very delicious
Ingredients you will need for thisrecipe:
Cocoa powder - 110g (1 cups)
Coconut Oil - 40 ml (1/3 of a cup)
Honey or Maple Syrup -40g (1/3 of a cup)
Step 1
Over very low heat, melt coconut oilStep 2
Add cocoa, stir
Step 3
Add honey, (use more or less according to taste, stir
That's It basically!
pour it on a cookies sheet with parchment paper and put it in the freezer to get hard, because unlike commercial chocolate, there is no wax added.
Options: this is where the fun starts! Instead of pouring it on a cookie sheet, add nuts/seeds, dried fruit, cayenne, sea salt, make individual treats, or add oatmeal, or rice crispies and make power bars, or what ever.
Some people use essential oils like orange or peppermint for added flavour. Be creative, have fun!
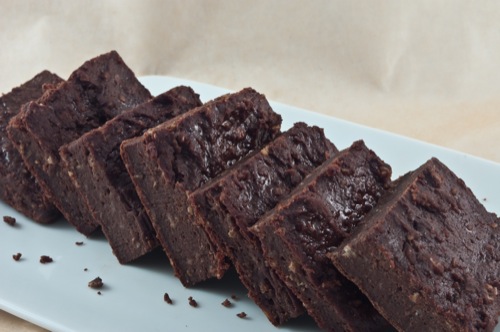
Black Bean Brownies
Prep time: 10 min | Cook time: 30 min | Total time: 40 min
Servings: 9
Dense, fudge-y and ultra-healthy, these brownies are a great alternative to traditional brownies! It's amazing how they taste like chocolate and fudge and not beans! Chef's Notes: Rolled oats run through the food processor may substituted for the instant oats. Use optional Honey if your bananas are still green and not very ripe.
Ingredients
-
15 ounces black beans, drained and rinsed
-
2 whole bananas
-
⅓ cup Honey or Maple Syrup
-
¼ cup unsweetened cocoa
-
1 tbsp cinnamon
-
1 tsp vanilla extract
-
¼ cup instant oats
Instructions
Preheat oven to 350 F. Grease an 8x8" pan and set aside. Combine all ingredients, except oats, in a food processor or blender and blend until smooth, scrapping sides as needed. Stir in the oats and pour batter into the pan. Bake approximately 30 minutes or until a toothpick inserted in the center comes out clean. Allow to cool before slicing. Chef's Note: if you find these brownies are too soft or too fudge-y, add another 1/4 cup oats or flour.
Nutritional Information
-
Serving Size: 1
-
Servings Per Batch: 9
-
Amount Per Serving
-
Calories 112
-
Fat 0.90g
-
Carbohydrate 24.70g
-
Dietary Fiber4.80g
-
Sugars12.20g
-
Protein3.50g
-
Coconut mint matcha cake
Time: 10 mins / Serves: 2
Base:
-
2 TBSP sunflower seeds, ground
-
2 TBSP linseed (flax seeds), ground
-
2 Medjool dates
-
Filling:
-
1 cup coconut shreds
-
1 banana
-
3 TBSP lemon juice
-
1 TBSP sweetener of choice (raw honey, maple syrup)
-
handful of mint
-
To make the base, mix the ingredients until you have a sticky dough. You can do that by hand. Then press the ‘dough’ into your cake pan.
To make the filling, add all the ingredients except the mactha to a blender and blitz until you get them creamy. Scoop out 1/3 of the mint filling and spread it on top of the base.
Scoop out the rest of the filling in a bowl and mix it with 1/2 tsp matcha. Scoop out half of this mint matcha filling and spread it on top of the mint layer.
Mix the remaining filling with 1/3 tsp matcha then spread it on top of the other two cake layers.
Refrigerate the cake for at least 30 minutes.Before serving, dust the cake with matcha green tea. Best served chilled.
-
1/2 tsp + 1/3 tsp matcha green tea
-
Morning Glory Cookies (vegan,GF)
-
 September 29, 2013
  0 Comments
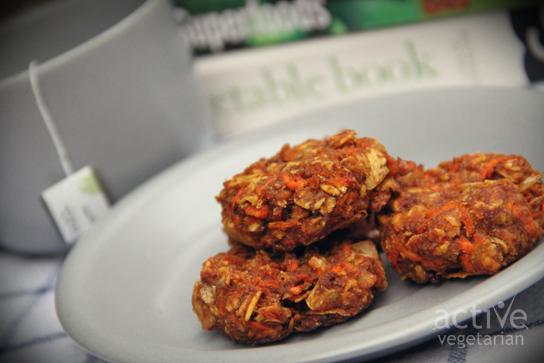
Glory Cookies (vegan,GF)
September 29, 2013 0 CommentsSaturday evening is a time to get creative in the AV kitchen.
This time the inspiration was my Sunday morning yoga class. I wanted to make something healthy and wholesome to share with my Yogis:) The finished product was a low-sugar gluten free Morning Glory Cookie – made with homemade date paste .
These cookies are crunchy, moist and delicious! If you make them ahead they would be a great addition to your breakfast especially if you are in a rush.Ingredients:
makes 3 dozen
-
1 1/2 cups spelt flour
-
1 teaspoon baking powder
-
1/4 teaspoon salt
-
1 teaspoon cinnamon
-
1 1/2 cups rolled oats, (we used Gluten Free)
-
1/2 cup melted coconut oil
-
1/2 cup date paste (get the recipe here)
-
Directions:
Preheat oven to 350˚F. Grease or line 2 baking sheets with parchment paper.
Sift the flour into a medium bowl, add oats, baking powder, salt, and cinnamon and set aside.
In a small bowl, mix the 2 tablespoons of flax meal with the 6 tablespoons water, set aside. In a large bowl, beat the coconut oil, date paste, sugar, and orange zest until smoothly blended. Next add the flax meal mixture and vanilla. Continue to mix in the carrots, coconut, and walnuts. The batter will be very wet at this point. Add the flour and oatmeal, mixing just until flour is incorporated. The dough will be soft and sticky.
Scoop 2 rounded tablespoons worth of dough onto prepared baking sheets, about 2 inches apart. Bake until the cookies are set but still light in color, about 13-15 minutes. You don’t want to over bake these! Allow them to cool on the pan for 5 minutes before transferring to a wire wrack to cool completely.
Store in a tightly covered container for up to 4 days.Enjoy
-
1/3 cup honey
-
1 teaspoon finely grated orange zest
-
2 tablespoons flax meal
-
6 tablespoons water
-
1 teaspoon vanilla
-
2 cups peeled/grated carrots (about 4 carrots)
-
1/2 cup shredded coconut
-
1/2 cup finely chopped walnuts

Sunflower Lentil Spread

Ingredients
-
1 (15-ounce) can lentils, (or 1 cup cooked) rinsed and drained
-
1 tablespoon lemon juice
-
1/4 teaspoon salt
-
1/4 teaspoon pepper
-
2 tablespoons sunflower seeds
-
1 celery stalk, finely diced
-
1 scallion, finely diced
-
2 tablespoons chopped fresh parsley
Preparation
1. Combine lentils, lemon juice, salt, and pepper in a blender; process until smooth.
2. Stir in sunflower seeds, celery, scallions, and parsley.
Serve on rye, rice, or your favourite gluten free cracker.
Flax Bread Sandwich.
I call this "focaccia" because it is baked in that style -- flat on a sheet pan, and then cut up into whatever sized pieces you want. It works for toast, sandwiches, and other bready uses. It is "rough" in texture like heavy whole grain breads. Since it isn't made with wheat, it doesn't have the same kind of grain as wheat breads, but the carb in flax is almost all fiber. Flax is very useful on a low carb diet, as well as being amazingly good for you.
Ingredients
-
2 cups flax seed meal
-
1 Tablespoon baking powder
-
1 teaspoon salt
-
1-2 Tablespoons sugar equivalent from artificial sweetener
-
5 beaten eggs
-
1/2 cup water
-
1/3 cup oil
-
Prep Time: 15 minutes
-
Cook Time: 20 minutes
-
Total Time: 35 minutes
Preparation
Preheat oven to 350 F. Prepare pan (a 10X15 pan with sides works best) with oiled parchment paper or a silicone mat.
1) Mix dry ingredients well -- a whisk works well.
2) Add wet to dry, and combine well. Make sure there aren't obvious strings of egg white hanging out in the batter.
3) Let batter set for 2 to 3 minutes to thicken up some (leave it too long and it gets past the point where it's easy to spread.)
4) Pour batter onto pan. Because it's going to tend to mound in the middle, you'll get a more even thickness if you spread it away from the center somewhat, in roughly a rectangle an inch or two from the sides of the pan (you can go all the way to the edge, but it will be thinner).
5) Bake for about 20 minutes, until it springs back when you touch the top and/or is visibly browning even more than flax already is.
6) Cool and cut into whatever size slices you want. You don't need a sharp knife; I usually just cut it with a spatula.
Nutritional Information: Each of 12 servings has less than a gram of effective carbohydrate (.7 grams to be exact) plus 5 grams fiber, 6 grams protein, and 185 calories.
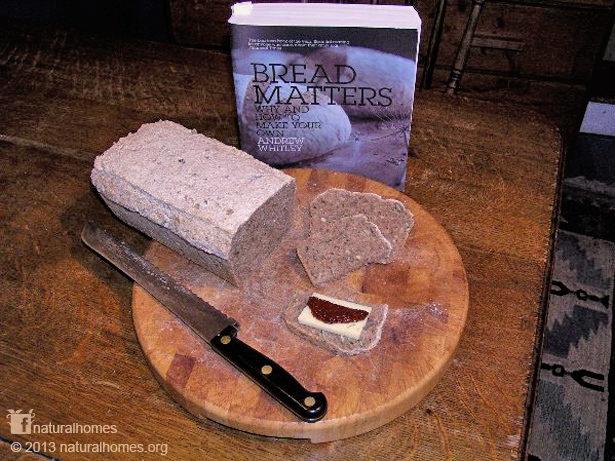
Rye sourdough (or wild yeast) bread
Making sourdough bread is easy. People have been making it for thousands of years without bread machines or visiting a supermarket for a packet of yeast. Rye flour, and many other types of flour, contain all the natural yeasts, bacteria, carbohydrate and enzymes needed to make truly delicious bread. The rich flavour of the bread comes from the acid developed by the various bacteria in the flour. The same acidity enables sourdough bread to keep so well. You will find it stays fresh for about a week and continues to develop its flavour.
It takes five or six days to develop a sourdough starter. The natural wild yeasts in the wholemeal rye flour develop best at around 30C. That’s not the easiest temperature to maintain, but don’t worry because the yeast will ferment at lower temperatures, it just takes longer. It’s not critically important to keep the sourdough at the same temperature all the time.
The natural yeasts in the flour will grow given time but you can start a sourdough with fresh baker’s yeast if you like. The acids that develop in the sourdough will eventually kill the baker’s yeast leaving the more acid robust wild yeasts to do their job. If you use baker’s yeast it’s referred to as spiking the dough. In the UK baker’s yeast is usually available from the in-house bakers of supermarkets. Just ask for a small amount of fresh yeast. In other countries like Norway it’s available on the chilled shelves near the dairy products.
How to prepare a sourdough starter.
On day 1 take 50g of warm, not hot, water and 25g of wholemeal rye flour. Mix the water and flour and put the mixture in a container, a large jam jar, with lid, is ideal. DON'T keep the mixture in an air-tight container and ideally not in a plastic container. On days 2, 3, 4, 5 and 6 add about 50g of warm water and 25g of wholemeal rye flour to the previous day’s sourdough. Stir the ingredients in to the starter, mixing in any water that might have separated during fermentation. After a while you won’t need to weigh the amounts. It’s not critical. What matters is gradually adding fresh flour containing fresh wild yeasts, carbohydrates and enzymes to feed the starter and develop the acids that give the bread its distinctive taste.
By day 7 you should have about 450g of sloppy, foaming starter that tastes slightly acidic and smells fruity. Natural wild yeasts, which survive the acids, are much slower acting than the more concentrated baker’s yeasts; as such the bread dough, once you’ve made it, takes longer to rise.
After you have baked your rye loaf add a further 50g of warm water with 25g of wholemeal rye flour to the remaining starter and follow the day to day additions for the next loaf of bread.
Making Rye Bread with Seeds
The trick to good rye bread is a soft moist dough. This dough is entirely different to the non-sticky kneaded dough of other breads. You do not knead sourdough. The texture of the dough you are looking for is something that’s about the consistency of mashed potato. The dough will take 2-6 hours to rise and will rise by about 40-60%.
480g flour (50% rye, 25% wholemeal stoneground wheat, 25% strong white wheat)
320g sourdough starter (leaving about 130g of starter for the next loaf)
10g sea salt
50g pumpkin 50g sunflower and a few teaspoons of dried oregano
280g warm water
|
|
Most of the minerals and vitamins in grains are in the outer layers. These are retained in the flour when the grain is stone ground. Since 1870 steel roller milling has removed the outer layers of the grain to increase the shelf life of the flour. This method of milling is good for the manufacturer, distributor and retailer but it’s not good for you the consumer stripping the flour of its essential minerals such as magnesium and zinc. |
|
Mix all the ingredients and then spoon in to a buttered bread tin about 21 x 11 x 6 cm in size, pressing it down in to the tin. This weight of dough will almost fill the tin leaving enough space for the dough to rise about 3cm above the rim of the tin.
Leave the dough to rise. In the sunlight on a warm spring day this will take about 2-4 hours but you can just as well leave it to rise overnight indoors. Slow rising is good, forming a structure in the bread that cuts well and is strong enough to be sliced thinly when cool.
Cook the bread at 200C for 15 minutes and turn down the heat to 160C for 10 more minutes turning the oven off and leaving the bread to cook in the remaining heat for another 5 minutes. Remove the bread from the tin. The bread will feel damp so allow air to circulate around it while it cools. This bread keeps beautifully for at least a week.
SWEET POTATO BREAD
The kids and I follow a largely gluten free and relatively low grain diet. The food my daughter most often requests is bread, her gorgeous little face lights up when she comes home and sees this on the bench, or when I pack fairy bread sandwiches into her lunch box. We all enjoy this as much as any bread we have ever eaten. It is quick, easy, moist and delicious. Best of all it is full of goodness.
I cannot wait for you all to try this recipe. It is simple to throw together, it feels indulgent and yet it is incredibly nutritious and filling. I hope your family loves it as much as we do.
Sweet Potato Bread
300 grams cooked sweet potato flesh*
1/2 cup coconut flour
3 eggs
3 tablespoons of coconut milk
1 teaspoon bicarb soda / baking soda
Juice of half a lemon
pinch of salt
*I roast a purple skin / white flesh sweet potato and keep the flesh for this recipe, I personally think the skins are delicious ad eat them as they are. You can use whatever sweet potato you like.
Preheat your oven to 180 Degrees Celsius or 350 Degrees Fahrenheit.
Grease and line a mini loaf tin (mine is 6″ x 2.5″ ) with baking paper hanging oven the sides for easy removal.
Put the ingredients into your food processor or blender and pulse until well combined. Spoon the mixture into the prepared tin, smooth over the top with a spoon. Bake for 40 minutes. Cover the loaf with foil and bake for a further 20 minutes. Remove from the oven and allow to cool before slicing, Enjoy.The Spice That Prevents Fluoride From Destroying Your Brain
on 24 April, 2014 at 00:19

Fluoride is found everywhere today, from antibiotics to drinking water, no stick pans to toothpaste, making exposure inevitable. All the more reason why new research proving this common spice can prevent fluoride damage is so promising!
Fluoride’s neurotoxicity has been the subject of academic debate for decades, and now a matter of increasingly impassioned controversy among the general public, as well. From ‘conspiracy theories’ about it being first used in drinking water in Russian and Nazi concentration camps to chemically lobotomize captives, to its now well-known IQ lowering properties, to its ability to enhance the calcification of the pineal gland – the traditional ‘seat of the soul’ – many around the world, and increasingly in the heavily fluoridated regions of the United States, are starting to organize at the local and statewide level to oust this ubiquitous toxicant from municipal drinking water.
Now, a new study published in the Pharmacognosy Magazine titled, “Curcumin attenuates neurotoxicity induced by fluoride: An in vivo evidence,” adds experimental support to the suspicion that fluoride is indeed a brain-damaging substance, also revealing that a natural spice-derived protective agent against the various health effects associated with this compound is available.
The study was authored by researchers from the Department of Zoology, University College of Science, M.L. Sukhadia University, Udaipur, India, who have spent the past decade investigating the mechanisms through which fluoride induces severe neurodegenerative changes in the mammalian brain, particularly in cells of the hippocampus and cerebral cortex.[i] [ii]
The study opens by describing the historical backdrop for concern about fluoride’s significant and wide ranging toxicity:
“Fluoride (F) is probably the first inorganic ion which drew attention of the scientific world for its toxic effects and now the F toxicity through drinking water is well-recognized as a global problem. Health effect reports on F exposure also include various cancers, adverse reproductive activities, cardiovascular, and neurological diseases.[1,2]“
The study focused on fluoride induced neurotoxicity, identifying excitoxicity (stimulation of the neuron to the point of death) and oxidative stress as the two main drivers of neurodegeneration. It has been observed that subjects with the condition known as fluorosis, a mottling of tooth enamel caused by excessive exposure to fluoride during tooth development, also have neurodegenerative changes associated with a form of oxidative stress known as lipid peroxidation (rancidity). Excess lipid peroxidation in the brain can lead to a decrease in total brain phospholipid content. Owing to these well-known mechanisms of fluoride associated neurotoxicity and neurodegeneration, the researchers identified the primary polyphenol in the spice turmeric — known as curcumin – as an ideal agent worth testing as a neuroprotective substance. Previous research on curcumin indicates that it is capable of activing as an antioxidant in 3 distinct ways by protecting against: 1) singlet oxygen 2) hyrodxyl radicals and 3) superoxide radical damage. Also, curcumin appears to raise endogenous glutathione production in the brain, a major antioxidant defense system.
In order to assess the neurotoxic effects of fluoride and prove curcumin’s protective role against it, researchers randomly divided up mice into four groups, for 30 days:
-
Control (no fluoride)
-
Fluoride (120 ppm): fluoride was given in distilled water drinking water without restriction.
-
Fluoride (120 ppm/30 mg/kg body weight) + Curcumin: Oral dose of curcumin dissolved in olive oil along with fluoride in drinking water
-
Curcumin: (30 mg/kg body weight)
In order to ascertain the effect of treatment, the researchers measured the malondialdehyde (MDA) content in the brains of the different treated mice. MDA is a well-known marker of oxidative stress/damage.
As was expected, the fluoride (F) only treatment group showed significantly elevated MDA levels vs. the non-fluoride treated control. The F + Curcumin group saw reduced MDA levels vs. the fluoride only group, demonstrating curcumin’s neuroprotective activity against fluoride associated neurotoxicity.
The study concluded,
“Our study thus demonstrate that daily single dose of 120 ppm F result in highly significant increases in the LPO [lipid peroxidation, i.e. brain rancidity] as well as neurodegenerative changes in neuron cell bodies of selected hippocampal regions. Supplementation with curcumin significantly reduce the toxic effect of F to near normal level by augmenting the antioxidant defense through its scavenging property and provide an evidence of having therapeutic role against oxidative stress mediated neurodegeneration.”
Discussion
This is far from the first study to demonstrate curcumin’s remarkable brain-saving properties. From the perspective of the primary research alone, there are over two hundred peer-reviewed published studies indicating that curcumin is a neuroprotective agent. On our own turmeric database we have 115 articles proving this statement: Turmeric Protects The Brain. We have also featured studies on turmeric’s ability to protect and restore the brain:
-
How Turmeric Can Save the Aging Brain From Dementia and Premature Death
-
Turmeric Produces ‘Remarkable’ Recovery in Alzheimer’s Patients
Considering the many chemical insults we face on a daily basis in the post-industrial world, turmeric may very well be the world’s most important herb, with over 600 evidence-based health applications.
[i] Bhatnagar M, Rao P, Saxena A, Bhatnagar R, Meena P, Barbar S. Biochemical changes in brain and other tissues of young adult female mice from fluoride in their drinking water. Fluoride. 2006;39:280–4. [Ref list]
[ii] Bhatnagar M, Sukhwal P, Suhalka P, Jain A, Joshi C, Sharma D. Effects of fluoride in drinking water on NADPH-diaphorase neurons in the forebrain of mice: A possible mechanism of fluoride neurotoxicity. Fluoride. 2011;44:195–9. [Ref list]
About the Author
Sayer Ji is the founder of GreenMedInfo.com, an author, educator, Steering Committee Member of the Global GMO Free Coalition (GGFC), and an advisory board member of the National Health Federation.
He founded Greenmedinfo.com in 2008 in order to provide the world an open access, evidence-based resource supporting natural and integrative modalities. It is widely recognized as the most widely referenced health resource of its kind.
Disclaimer: This article is not intended to provide medical advice, diagnosis or treatment. Views expressed here do not necessarily reflect those of WakingTimes, The Mind Unleashed, or its staff.
DRINKS and SMOOTHIES
Turmeric is known to be one of the most powerful healing herbs. It is great for bones and joints as it has anti-inflammatory properties. It prevents metastases from occurring in many different forms of cancer.
Turmeric's also a natural liver detoxifier and a kidney cleanser, and it speeds metabolism and aids in weight management. Plus it heals and alleviates conditions of depression, psoriasis, damaged skin, arthritis and more.
For these reasons, turmeric is ubiquitous both in Ayurveda and Chinese Medicine.
Here's what you'll need to get started:
-
5-7 inches turmeric
-
5-7 tamarind
-
2 lemons
-
raw honey
-
water
-
blender
-
strainer
-
bowl
-
mason jar(s) or other glass jar with lid
Peel turmeric. Your fingers will turn yellow. Don’t worry! All-natural dish soap gets it right out. If your cutting board/ counter-top gets stained, slather on dish soap & rubt in. Let it soak in for 5 min or longer, then scrub with water and sponge. The turmeric stain will vanish!
2. Crack and open tamarind. Make sure you get all the inner roots off, too. We’re only going to use the inner fruit.
3. Fill pot with water, put peeled tumeric in and let it boil for at least 20 minutes until the water becomes a rich and vibrant marigold color.
4. While the tumeric water is boiling, get a pan and pour 1 inch of water in with the peeled tamarind. Move the fruit around with a wooden utensil, mix it in with the water so it can melt and dissolve into a jam like texture. More water shouldn’t be needed, but if it’s lookin’ a bit dry, pour water in as needed.
By this time, you should be able to see the little seeds coming out. When the texture looks soft, turn heat off and let it cool down.
5. Go back to the tumeric water. By now, the color should look ready. Pour a little bit of cold water to lower the temperature. Take the turmeric water and pour it into the blender with the tumeric. We boiled it so the root could soften and have more flavor, now it’s ready to buzz in the blender for even more flavor and richness! Blend, blend, blend. The color now should look like an extra extra fiery marigold.
6. Go back to the tamarind in the pan. Pour substance into strainer that is placed on top of a small bowl to catch the tamarind. Swish the jam like substance around in the strainer with the wooden utensil-- we only want to use the soft bits of the fruit. No seeds, no seed peels.
7. Pour the tamarind that has been caught in the bowl into the blender with the tumeric water. Buzz it around again.
8. We’re almost done. Squeeze your lemons into the blender. Now take the blender and pour your yummy juice into your mason jar(s). Add honey to taste, close with lid, shake it up to mix.
9. Store in fridge up to 3-4 days and drink daily!
Enjoy!
-
Our Perfect Veggie Burger
-
Crunchy, chewy, with a crispy outer shell, these delicious veggie burgers have all the right elements we love in a veggie burger. Light on the beans, these burgers aren’t mushy in the middle, but have a nice mixture of breadcrumbs, chopped almonds, sunflower seeds, and seasonings to round them out. Best of all, they work great in the oven, frying pan, or even on the BBQ. They can also be made gluten-free by using gluten-free oats, Tamari, and breadcrumbs.For breadcrumbs. I used 3 slices of Ezekiel bread.
Yield: 8 burgers
-
1/2 cup onion, diced
-
1 large garlic clove, minced
-
Flax eggs: 2.5 tbsp ground flax + 1/2 cup warm water, mixed in bowl
-
1 cup oats, processed into flour* (other flours might work)
-
1.5 cups bread crumbs (I processed 3 pieces of Ezekiel bread until fine crumb)*
-
1 cup grated carrots
-
1 cup cooked black beans, rinsed and roughly pureed or mashed
-
Heaping 1/4 cup finely chopped parsley (or fresh herb of choice)
-
1/3 cup almonds, chopped (toasted if preferred)
-
1/2 cup sunflower seeds, (toasted if preferred)
-
Directions:
1. Preheat oven to 350F (if baking). In a large skillet, sauté onions and garlic in 1/2 tbsp oil. Mix your flax egg together in a small bowl and set aside for at least 10 mins while you prepare the rest of the ingredients.
2. Place all ingredients (except spices and salt) into a large mixing bowl and stir very well. Now, add seasonings and salt to taste.
3. With slightly wet hands, shape dough into patties. Pack dough tightly as this will help it stick together. I made 8 medium patties.
4. Cooking methods: You can fry the burgers in a bit of oil on a skillet over medium heat for about 5 minutes on each side. If baking in the oven, bake for 25-30 mins (15-17 minutes on each side) at 350F, until golden and crisp. For the BBQ, pre-bake the burgers for about 15 minutes in oven before placing on a pre-heated grill until golden and crisp on each side. Our preferred method of cooking was frying in the skillet!!
GF Note: To make these burgers gluten-free, use certified GF oats, GF Tamari, and gluten-free breadcrumbs.
Read more: http://ohsheglows.com/2011/07/13/our-perfect-veggie-burger/#ixzz2hXLSV55M -
1 tbsp. Extra Virgin Olive Oil
-
1 tbsp Tamari (soy sauce)
-
1.5 tsp chili powder
-
1 tsp. cumin
-
1 tsp. oregano
-
Fine grain sea salt and black pepper, to taste (I used about 1/2 tsp salt or a bit more)
-
Recipes from The Kitchn
 Shiitake Mushroom & Tofu Potstickers
This might sound shocking, but I have to say it: potstickers might be my favorite food. They are my go-to meal when I'm home alone for dinner and my favorite crowd-pleasing appetizer. I even eat them cold for airplane meals. On top of this, you can fill them with anything under the sun and freeze them for handy weeknight meals. This particular combination of rich shiitake mushrooms, chewy baked tofu, and silky cabbage is like an old and very dear friend, one that I never tire of seeing.

I eat plenty of frozen potstickers from the store, but I also love the rhythm of making my own. It takes some time, but it's an achievable goal with dependably delicious results. You also end up making a lot, which can be frozen for future meals.
These particular potstickers came about when I wanted a vegetarian meal to pack up for lunches or take on planes — something that could go unrefrigerated for a few hours. After toying with the recipe — a little more ginger, swapping baked tofu for fresh tofu, settling on shiitake mushrooms — these have become my favorite. They are the perfect little one-bite package: mild at first nibble and then bursting with satisfying umami flavors.
Oh, and don't skip the step where you squeeze the cooked cabbage. This is important for getting rid of the excess moisture and making sure these dumplings stay compact, dense, and perfectly chewy, just like a good potsticker should be.

Shiitake Mushroom & Tofu Potstickers
Makes 55 to 60 potstickers
4 ounces shiitake mushrooms, stems removed and caps diced small
1 pound napa cabbage, quartered down the length and thinly sliced across (about 5 cups)
1 teaspoon salt
6-7 ounces baked tofu (see Recipe Note)
3-4 scallions, thinly sliced across
1 tablespoon minced ginger
1 clove garlic, minced
1 1/2 tablespoons rice wine vinegar
1 tablespoons soy sauce
2 teaspoons sesame oil
1/2 teaspoon black pepper
1 egg, beaten (optional, see Recipe Note)
55-60 circular or square-shaped (4.5-inch) dumpling, wonton, or gyoza wrappers
To serve: soy sauce, rice wine vinegar, red pepper flakesHeat 2 teaspoons of oil in a large skillet over medium-high heat. Add the diced shiitake mushrooms and sauté for about 5 minutes, until softened and turning golden brown. Add the cabbage and the teaspoon of salt to the pan. Continue to cook, stirring occasionally, until the cabbage is completely wilted, 3-4 minutes. Transfer the mixture to a bowl and set aside until cool enough to handle.
Meanwhile, crumble the tofu into a large mixing bowl. Add the scallions, ginger, garlic, soy sauce, rice wine vinegar, sesame oil, and black pepper. Stir to combine.
Squeeze handfuls of the cooled mushroom-cabbage mixture in your fist to squeeze out as much moisture as possible and transfer to the tofu mixture. Stir to combine all the ingredients and taste. Add more of any of the seasonings to taste. If using the egg, thoroughly mix it into the filling mixture. (You should have about 3 cups of filling total.)
Set a bowl of water and a baking sheet lined with parchment paper near your workspace. Lay several dumpling wrappers on the work surface and place a scant tablespoon of filling in the middle of each. Dip a finger in the water and run it around the edge of the first dumpling wrapper. Fold the wrapper over and pinch it closed. If the wrapper opens again, dab it with a little water and pinch again. Repeat with remaining wrappers until all the filling is used.
At this point, the potstickers can be cooked immediately or frozen for later meals. If freezing, arrange them as closely as possible on the baking sheet without touching. Freeze until solid, then transfer to a freezer container and freeze for up to three months. Potstickers can be cooked straight from the freezer while still frozen.
To cook the potstickers, heat a large skillet (with the lid nearby) over medium-high heat and coat the bottom with about a tablespoon of oil. Place as many dumplings in the pan as will fit in a single layer without touching. Cook until the bottoms have turned golden-brown, 1-2 minutes.
Pour 3 tablespoons of water into the pat and immediately cover with a tight fitting lid. Turn the heat to low and steam the dumplings for 3-5 minutes if fresh or 6-8 minutes if frozen, until all the water is absorbed and the wrappers are translucent. If you'd like even crunchier bottoms, return the heat to medium-high and cook, uncovered, until the bottoms are as crispy as you like them.
Transfer potstickers to a serving platter and repeat with remaining dumplings. Serve immediately with soy sauce mixed with rice wine vinegar and red pepper flakes for dipping.
Recipe Notes
-
Baked tofu can usually be found in the refrigerated part of the produce section along with the fresh tofu. Try to find one with only light seasoning. If baked tofu can't be found, use 7 to 8 ounces of extra-firm tofu and press it beneath something heavy to expel the as much liquid as possible before cooking. Or make your own baked tofu!
-
The egg helps to bind the filling together, making it easier to handle as you shape the potstickers and giving the potstickers a more compact texture. However, if you are vegan or planning to make these potstickers ahead to eat on the go, you can skip the egg.
-
If shiitake mushrooms can't be found, substitute baby bella mushrooms.

(Images: Emma Christensen)
Quinoa Pizza Bites | RecipeThis delectable snack will certainly keep you in your taste buds happy!!
Quinoa Pizza Bites
Makes ~40 bites
2 cups cooked quinoa
2 large eggs
1 cup chopped onion
1 cup shredded mozzarella cheese
2 tsp minced garlic
1/2 cup fresh basil, chopped
1 cup chopped pepperoni slices (~1/2 of a 7 oz bag)
1/2 tsp seasoning salt
1 tsp paprika
1 tsp dried crushed oregano
pizza sauce for dipping
1. Preheat oven to 350 degrees.
2. Mix together all ingredients, except pizza sauce, in a medium mixing bowl.
3. Distribute mixture into a greased mini muffin tin, filling each cup to the top (1 heaping Tbs each), and press down gently to compact.
4. Bake for 15-20 minutes.
Nutritional Information for 5 bites per MY FITNESS PAL: Calories – 175, Fat – 10g, Protein – 9g, Fiber – 2g, Calcium – 10mg, Carbs – 12g -

Vegan Popcorn Chicken
Ingredients:
-
1.5 Cups Dry Soy Chunks or Nuggets/TVP
-
Water
-
2 Garlic Cloves, Mashed
-
1″ Ginger, Grated
-
Salt
For the coating:
-
1/4- 1/2 cup (7 approx. tablespoon) All Purpose Flour (adjust amount, a little more or less)
-
1/2 Cup Corn Starch/Corn Flour
-
1 Cup Water
-
Salt
-
Black Pepper
-
Garlic Powder
-
Any other spice if you want to use (Optional)
-
1 Cup Bread Crumbs
-
Oil for deep frying
Updated the amount of all purpose flour. there was a mistake in the previous mentioned amount.
Preparation:
Boil about 4 Cups of water with mashed garlic and grated fresh ginger. Stir in 1/2 teaspoon of salt & add the soy chunks/nuggets to the water. Cover & Soak for about 15 Minutes. There is no harm done if they soak longer than 15 minutes. Just don’t leave it overnight:-)
Drain the Soy Chunks, and cool. Gently squeeze out some water out of the nuggets (by wrapping them in a cheese cloth or paper towels or between the palm of your hands), they will still stay soft after doing this. Set the nuggets aside.
Combine the all purpose flour and one cup of water and stir till smooth and lump free. Divide this thick batter in to 2 equal halves in two wide bottomed bowls/deep dishes.
In a zip lock bag pour in the corn flour/corn starch.
In another zip lock bag, combine the bread crumbs, black pepper, salt and garlic powder (+ any other spices if you are using them). Shake them till well combined.
Take all the nuggets and add them to one of the bowls containing the flour batter. Toss them well till all the nuggets are well coated on all sides. Toss all the batter coated nuggets into the zip lock bag containing the corn flour/corn starch. Lock the back and give a good shake till all the nuggets are coated with the corn flour.
Pour out the nuggets into the other bowl/dish containing the flour batter. Toss again till the nuggets are well coated on all sides. Now pour out the nuggets in the bag with the bread crumbs and spices. Shake the bag really really well to coat the nuggets evenly on all sides.
Heat oil and a pan. (There should be enough oil for the nuggets to be completely deep fried); You will know that the oil is hot and ready, when you drop a pinch of bread crumb in the oil and it sizzles back right up to the top. Add the nuggets to the oil and fry them till golden brown. (If you have used a smaller pan, fry them in batches). Drain on a paper towel.
Serve hot with your favorite sauce/ketchup/chutney.
I am hoping this recipe will help many of you who are transitioning to a restricted diet, be it grain, gluten or dairy free. Even if you are simply cutting our processed foods I hope this recipe makes it a bit easier for you. It is perfect as a snack or as a meal, it tastes delicious and is also sustaining. I cannot wait until you all try it, be sure to let me know what you think.
Butternut Squash Mac & Cheese
July 5, 2010 by theveganproject

Prep: roast 1 small butternut squash with olive oil, onions, garlic and salt & pepper.
- Puree in blender or food processor with 1 can coconut milk.
- boil macaroni or other pasta until al dente.
- add 1 tablespoon Earth Balance vegan butter to cooked pasta and ½ cup vegan cheese, and the butternut squash puree.
- pour into casserole dish, sprinkle with vegan cheese and crushed roasted rice.
- bake at 350 degreees for 20 min. You may finish by broiling for 2 min to get a brown crust on top.
Toasted Rice
- in a dry skillet, toast rice until golden and fragrant.
- Grind in a motar and pestle until a sandy texture
Sprinkle on thai food, salads, etc, for extra toasty flavor and crunchy texture.
Serve with…
- roughly chop apples and toss with 1tsp lemon juice and 1tsp cider vinegar
- sautee chopped onion, apples, and kale in olive oil. Season with salt and pepper.
*Courtesy of Janine Jankowski
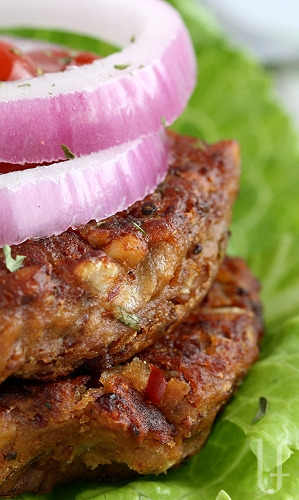
Beans…the more you eat…the more...healthy you get!
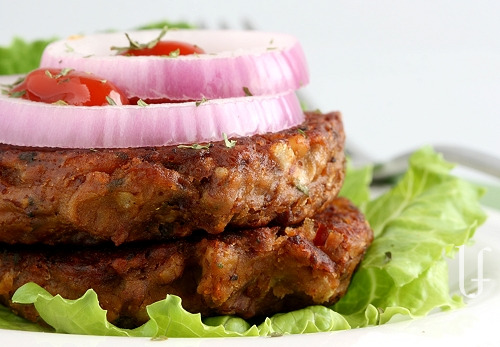
BEST BEAN BURGERS, OR MEATBALLS
Okay…some of us may toot…but they’re still super healthy!
I like to use them in lots of ways – although simply in a bowl with a little butter and spices is fantastic – and these burgers were really good.
With added ground nuts to up the protein, the carbs are complex and fiber-filled. On a toasted whole rye bun or plain with all the fixings, or use them for mearballs with your spagetti squash pasta these make a very filling meal. (They are even better as leftovers.)
One Cup of your favourite cooked beans, drained, rinsed and mashed
1/4 cup pecans, coarsely ground
1/4 cup onion, finely diced
1 clove garlic, minced
1 egg
2 tablespoons nut, bean, or oat flour
2 tablespoons chopped fresh parsley
1 tablespoon salsa
1/2 teaspoon chili powder
1/2 teaspoon sweet yellow curry powder
1/4 teaspoon cumin
1/4 teaspoon celtic sea salt
1/8 teaspoon freshly ground black pepper
In a large bowl combine the mashed beans, pecans, onion, garlic, egg white, flour, parsley, ketchup, chili powder, curry powder, cumin, salt, and pepper. Mix well and chill for 15 minutes.
Form into burgers or meatballs and fry in a small amount of coconut or olive oil, or in a nonstick pan sprayed with vegetable cooking spray, over medium heat. Makes 5 burgers.
Per burger: 126 Calories; 6 g Protein; 4 g Tot Fat; 17 g Carb (13 NET); 4 g Fiber; 289 mg Sodium

If you love cabbage, you are going to freak out about how good this is. Now, if you are on the fence about cabbage, you need to try this because this might be the recipe that converts you to a cabbage lover.
This is a simple side dish worthy of a dinner party and couldn’t be easier to make. Four ingredients, a couple of minutes to prepare and toss in the oven for an hour.
Ingredients
1 (approx 2lb) head of organic green cabbage, cut into 1″ thick slices
1.5 tablespoons olive oil
2 to 3 large garlic cloves, smashed
kosher salt
freshly ground black pepper
spray olive oil OR non-stick cooking spray
Instructions:
1. Preheat oven to 400F and spray a baking sheet with non-stick cooking spray. Pull outer leaf off cabbage (it’s usually dirty and nasty looking), cut cabbage from top to bottom (bottom being root) into 1″ thick slices.
2. Rub both sides of cabbage with smashed garlic.
3. Use a pastry brush to evenly spread the olive oil over both sides of the cabbage slices.
4. Finally, sprinkle each side with a bit of kosher salt and freshly cracked black pepper.
5. Roast on the middle rack for 30 minutes. Carefully flip the cabbage steaks and roast for an additional 30 minutes until edges are brown and crispy.
Serve hot and Enjoy!
Helping People Like You Heal, Since 1996
519-440-3463